Your raft thumps into Thunder River’s fog tunnel, heart rate spikes, and—splash!—your lens is either serving TikTok gold or a blurry wash of panic water. Which one it is depends on where you bolted that GoPro 30 seconds ago.
Key Takeaways
Scanning the full article can wait—this quick-hit list locks in the mission-critical moves before your sneakers even squeak on the dock. Read it once, screenshot it for the queue, and you’ll glide through staff inspections, nail the money shot, and still have time to high-five the crew before the next raft launches. Each point below distills a deep dive section later on, so circle back when you want the why behind the what.
Second, remember that every drop, twist, and tunnel strobe has a gear-testing counterpart at parks from Wisconsin Dells to Pennsylvania. The tips here protect you across them all, and they’re organized so beginners can follow, yet veterans still pick up pro-level polish. Use this list as a packing checklist, a line-time refresher, and a post-ride troubleshooting guide—your footage will thank you.
– Chest mount gives the steadiest view; tilt it slightly down so water slides off
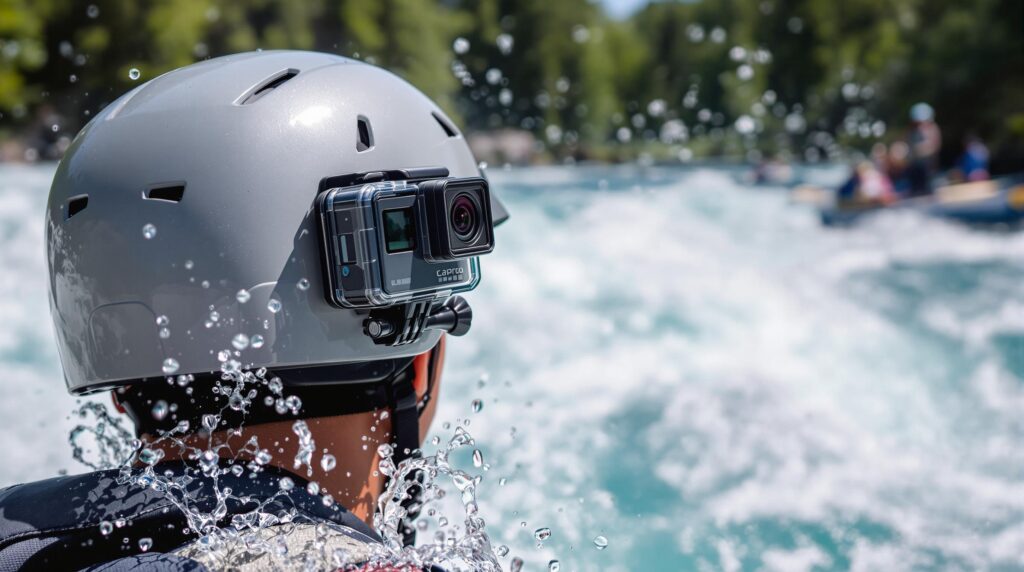
– Helmet mount shows the whole river but must be tightened hard and tied with a lanyard
– Wrist mount flips to selfie fast; keep arms close to cut shake
– Plastic clamp on raft is OK if park agrees; place it low so it stays out of sight
– Show staff a strong tug test; selfie sticks and painted-surface suction cups fail instantly
– Store a spare mount, rubber lanyard, battery, and SD card in a nearby locker
– Wipe baby shampoo on the lens, rinse once, and fog or spots won’t stick
– Record at 1080p 60 fps with HyperSmooth on; set exposure –0.5 for dark tunnel parts
– Seat tall helmet riders in back and kids with chest mounts in front to see every face
– Grab off-ride shots from bridges or mini-golf spots to mix with POV footage
– Dry gear, recharge, and back up files at camp before sharing your splash video.
Ready to lock down footage so sharp it earns Reels hearts, family scrapbook smiles, and crystal-clear vlog B-roll all in one run? Stick with us. We’re mapping every mount spot—chest, helmet, wrist, even the raft rail—plus the quick tweaks that keep the camera on, the drops smooth, and the water spots gone. Dive in; your best one-ride-only shot starts in the next paragraph.
Know the Ride, Nail the Shot
Thunder River at Waldameer Park is no gentle float. Boats glide through a misty storm tunnel, pick up speed, then tackle two back-to-back drops that guarantee a face-full of water and a chorus of screams. By the time the second crest hits, the splash zone has gone full fire-hose, so your mount choice needs to handle both momentum and drench power.
The ride profile matters because each force—fog-induced low light, tunnel vibration, crest acceleration—tests stability in different ways, and understanding that profile sets expectations before you ever click the buckle. If you crave a comparison point, think Avalanche at Timber Falls, a wooden coaster famous for sharp, shudder-heavy turns that rattle poorly tightened screws, or Kalahari Resort’s Smoke That Thunders slide with its twisting blackout sections that punish shaky rigs. Riders reporting chest-strap success on Avalanche and helmet-cam wins on Smoke That Thunders face the same physics you’ll encounter on Thunder River. Knowing that, you can predict vibration risk, plan your anti-fog prep, and choose gear up to the task of handling both splash and shake Waldameer ride details Avalanche coaster forum Smoke That Thunders clip.
Pre-Board Checklist—Pass the Park’s Shake Test
Arrive fifteen minutes early and chat up the attendant; Thunder River staff decide on the spot whether your rig qualifies as a “loose article.” Ninety percent of the time plastic-buckle chest or helmet straps sail through inspection, while selfie sticks and suction cups stuck to painted surfaces get a fast veto. Demonstrate confidence with a tug test—give the camera a firm yank so the attendant sees zero movement, then offer a quick rundown of your backup tether and waterproof housing.
Keep a backup mount in a coin-op locker near the ride gate in case your first choice fails the exam. Wisconsin Dells parks scatter these lockers at high-thrill attractions for exactly this reason, and a two-dollar key can rescue priceless footage. Grab an extra rubber lanyard too; most parks approve setups that have secondary security clipped to your life-vest ring or seat belt. Spending thirty seconds on this checklist beats losing both camera and data mid-drop and keeps the line moving so staff view you as a prepared pro rather than a rule-testing wildcard.
Mount-By-Mount Breakdown—Pick Your POV
Chest mounts serve up the king-seat perspective that puts viewers right behind your lap bar. They hug your center of gravity, killing shake and usually clearing safety restraints without a fuss. Angle the lens five degrees down so water beads slide off, not cling on; a single dab of baby shampoo rubbed across the housing glass and rinsed in queue lines prevents fog and spot buildup during repeated soakings.
Helmet or head straps elevate the horizon line to bring friends and scenery into frame. Expect stronger wind pull and stricter staff eyeballs, so swap the factory knob for a low-profile wrench-tightened screw that refuses to vibrate loose. Clip a thin lanyard from the rear strap to your life-vest loop and you’ll look inspection-ready.
Wrist or forearm mounts flip from front view to selfie view in a heartbeat, perfect for reaction shots when you want followers to see that “oh-no” face. The trade-off is extra shake and the temptation to swing arms outside the raft, so coach younger riders to rest elbows on chest during drops. The payoff is a priceless collage of scream-to-laugh transitions that can headline a family recap reel.
Fixed clamps on the raft’s frame create rock-steady tracking of the channel ahead, but only plastic, flush designs pass most policies. Position the clamp away from lap bars and keep hardware below eye level so it doesn’t block the tunnel light show. Pair this static angle with a helmet cam in the back row and you’ll have dual footage ready for multi-cam edits without reriding five times.
Seat and Raft Layout—Who Shows Up in Frame?
Seat choice is the secret sauce for group coverage. A front-row chest mount captures the raw drop view, but the camera can miss rear faces unless the boat is full. Shift taller riders to rear corners with helmet cams; their elevated angle sweeps over heads and catches every grin on the plunge. Meanwhile, shorter riders up front with chest straps keep the horizon open while giving parents or scout leaders a clean view of the big splash payoff.
In a four-pack family scenario, place kids in the front with chest mounts, mom or dad behind them with a wrist mount ready to swivel, and the second parent running a helmet cam in the opposite rear corner. For bigger groups, map seating like a film set—front left for hero drop POV, front right for pure splash reaction, rear seats for wide helmets. This seating choreography means every friend, child, or troop member appears somewhere, sparing you the editing nightmare of guessing who vanished off-camera.
Splash-Proof Settings and Quick Specs
Dial video to 60 frames per second at 1080p for same-day uploads that don’t choke campground Wi-Fi. If storage is plentiful and time is not, 4K at 30 fps looks gorgeous but quadruples file size, so weigh ambition against bandwidth. HyperSmooth stays on, shutter speed remains auto, and popping exposure compensation to minus 0.5 inside the tunnel saves highlight detail without turning exterior shots murky.
Carry one spare battery sealed in a waterproof zipper pouch and swap during queue waits. Most GoPro HERO models drain fast under image stabilization, and nothing kills momentum like running dry at the crest. A low-profile thumb screw tightened with a mini wrench guards against Avalanche-style vibration while keeping unsightly protrusions off footage.
Off-Ride B-Roll That Levels Up Your Edit
Variety sells the story, so stage a second cam on safe ground while friends ride. Timber Falls mini-golf’s tenth hole sits directly behind Thunder River’s final splash; pop a mini tripod on the turf and frame a slow-motion arc of water that merges seamlessly with POV footage. At Kalahari’s Smoke That Thunders, a glass wall near the exit offers an overhead view of rafts swooping into the finale, and a suction cup sticks rock solid to the plexi without violating any painted-surface rules.
Bridge railings across Wisconsin Dells’ lazy rivers give you a bonus angle that stays clear of foot traffic. Clamp under the lower rail, run a safety tether around the post, and you’ve got a stable, crowd-free vantage point. Always double-check that your secondary cameras remain behind yellow lines, outside gated ride envelopes, and fully visible to operators so you keep both your gear and park relationships intact.
Back at Bonanza—Dry, Charge, Upload
Reserve an electric hookup site at Bonanza Camping Resort so a 30-amp post powers a small strip for chargers, laptops, and a tea-cup-sized dehumidifier pouch. Hang wetsuit or mesh gear bags from the picnic-table support beam so housings drip-dry away from sand, and your next-day mounts snap in fresh rather than gritty. Label two SD-card cases “Fresh” and “Shot,” swapping cards instead of formatting in-camera; that simple habit protects clips from accidental overwrite when excitement peaks.
During late-afternoon lull, grab the bench outside the camp store where Wi-Fi soars because most guests are still park-side. Off-load to a shockproof portable SSD, back up critical clips to cloud storage, then fire the GoPro Quik app to pull 15-second hero moments onto your phone while burgers sizzle. Add a “Dells Splash Countdown” text sticker, schedule the post for sunset, and watch engagement spike when the rest of the crowd scrolls their feeds from hotel lobbies.
Thunder River supplies the thrills, and Bonanza Camping Resort turns them into lifelong keepsakes. After snagging that jaw-dropping POV, swing back to your pine-shaded site, plug in the chargers, and replay every slow-mo splash around a crackling campfire while the kids toast marshmallows. With strong Wi-Fi, electric hookups, and a clean north-woods setting only minutes from the ride, editing and sharing your adventure before bedtime is effortless. Ready to capture—and truly savor—your next reel-worthy escape? Reserve your campsite or cabin at Bonanza today, and let the story you filmed on Thunder River flow straight into a memory-making night under the stars.
Frequently Asked Questions
Every rider shows up with a unique puzzle—some worry about lost cameras, others about fogged lenses, and still others about whether pint-size adventurers can carry their own rigs. This FAQ rounds up the questions asked most at the loading gate, in online forums, and around campground picnic tables, then answers them with solutions tested on the water. Read through before packing, bookmark for queue time, and you’ll breeze past common pain points that trip up less-prepared vloggers.
The answers lean on real-world trials from Thunder River, Avalanche, and Smoke That Thunders, so they hold up whether you’re rafting, coasting, or sliding. Each response stays brief enough to skim yet detailed enough that you can act on it the moment you unclip the camera cover. Dive in, solve fast, and keep rolling.
Q: Which GoPro mount gives the most immersive POV on Thunder River?
A: A chest harness set five degrees downward is the sweet spot because it stabilizes against your torso, clears safety restraints, and keeps the horizon line low enough that drops feel steeper on-screen while still catching friends’ faces and the tunnel lights.
Q: Will ride staff actually let me keep the camera on during the run?
A: Yes—if the camera is on a non-metal strap mount (chest or helmet) tightened so it won’t budge when tugged and you show a backup tether; selfie sticks, suction cups attached to painted surfaces, or anything that can detach mid-ride are almost always refused at the boarding gate.
Q: How do I stop water spots from ruining footage?
A: Smear a pea-size drop of baby shampoo on the housing lens, rinse lightly in the queue, and point the camera slightly downward; the film breaks surface tension so splash beads sheet off instead of clinging during the two big drops.
Q: Is it safe for my seven-year-old to wear a chest mount?
A: Child-sized chest harnesses approved for GoPro are fine as long as the strap plate sits center-mass, the buckle is fully clicked, and you verify with the attendant that it doesn’t interfere with the life-vest or seat belt before boarding.
Q: Where should our family sit so everyone’s face shows up in one shot?
A: Put kids with chest cams up front, a parent with a wrist mount directly behind them, and the second parent with a helmet cam in the rear corner; the staggered heights layer faces like stadium seating and none of the riders block each other during splashes.
Q: I’m worried about losing my GoPro—what backup works best?
A: Clip a thin rubber lanyard from the mount’s frame to your life-vest loop; it satisfies the “secondary security” rule most attendants look for and keeps the camera retrievable even if a buckle fails under the heaviest splash.
Q: Does the tunnel’s low light require special settings?
A: Leave shutter on Auto, drop exposure compensation to –0.5 so highlights outside stay controlled, and run 60 fps at 1080p; HyperSmooth will handle vibration and the mid-frame rate gives you slow-mo options without crushing file size.
Q: Which mount cuts shake best for 4K vlog footage?
A: A wrench-tightened chest plate coupled with HyperSmooth yields the lowest micro-jitter because the camera rides on your body’s natural dampening and stays centered through both crest accelerations.
Q: Are there lockers close to Thunder River for extra batteries and mounts?
A: Coin-operated lockers sit just outside the ride gate, so you can stash alternate rigs, swap cards, and keep spare batteries dry without trekking across the park.
Q: Can I run two cameras—one on the raft rail and one on my helmet?
A: As long as the raft clamp is low-profile plastic, doesn’t obstruct riders, and both setups have tethers, attendants generally allow dual rigs; show each mount, give them a quick shake test, and you’ll usually get the green light.
Q: Do I need parental permission forms to film an entire scout troop?
A: If the footage will be shared publicly, collecting written image-use consent from parents is best practice and aligns with most youth-group policies, even though the park itself doesn’t enforce it at the gate.
Q: How long will a single battery last with stabilization turned on?
A: Thunder River’s cycle is under four minutes, and a fresh GoPro battery recording 1080p60 with HyperSmooth typically lasts about 70-80 minutes, so you’ll get multiple runs, but bring a spare in a sealed pouch in case you queue-hop or film B-roll afterward.
Q: Any quick way to defog the lens in humid Wisconsin weather?
A: Pop an anti-fog insert or a trimmed coffee filter inside the housing, close it tight, and keep the camera out of direct sun while waiting in line; the insert absorbs moisture before it condenses on glass.
Q: What’s the fastest post-ride workflow if I’m editing the same day?
A: Swap the SD card into a portable SSD back at camp, pull key clips into the GoPro Quik app for auto-highlight, then upload the 15-second hero reel over campground Wi-Fi while your gear air-dries—no laptop render time required.